
Osmosis Type Blistering in GRP Hulls
If you have a specific concern regarding the development of blisters on your boat's hull, Fieldhouse Yacht Surveys would be happy to investigate these for you. Please contact us to discuss the problem. The information below gives useful information that will help you to understand the different kinds of blister that can develop on a fibreglass hull.

Some blisters are more worrisome than others. Half a cup of acidic, sticky fluid came out of this one
Identification and Treatment of Blisters
All laminates will allow low quantities of water molecules to pass through when submerged in fresh or salt water. As the water passes through it reacts with hydrolysable particles that are within the laminate. This reaction produces small quantities of a concentrated solution of acids and salts that collect in voids within the laminate. These voids are created during the vessel's fabrication.
Through the process of osmosis, more water is drawn through the semi permeable membrane of the gel coat and laminate in an attempt to dilute the solution. This process can increase the pressure of the fluid in the void to as much as 700psi. This pressure will eventually distort the gel coat or gel coat / laminate combination and can eventually burst it. In addition to osmotic pressure, another cause of blister formation is pressure created when the hydrolysis fluids are vapourised by solar radiation.
Hydrolysable particles are often called water soluble molecules (WSM) and can include dirt and dust trapped during fabrication, excess styrene, incomplete polymerisation, excess catalyst, accelerator, pigment, solvent, binders and condensation.
Note that the early stages of the development of a blister are very much a chemical process (hydrolysis). This early process has very little effect on hull strength, but if left to deteriorate too far, the fibreglass / resin lay-up will begin to delaminate. This delamination or de-bonding of fibres means that the loads carried by the laminate cannot be distributed through the resin, causing higher material stresses around the discontinuities in the bonding. Laminate failure can therefore occur at lower stresses than originally expected. This consequently means that the strength reserve factors that were applied to the original vessel design have been reduced. This may not be such a problem for an early build of cruising vessel that was manufactured with a thick laminate. However, the modern, mass produced vessels that have been designed with lower strength reserves (to save weight, cost and increase performance) may find that a similar level of delamination may leave the vessel dangerously weak.
Osmosis is just one effect of hydrolysis and therefore this is not the correct term, but one often incorrectly used to encompass moisture related defects such as wicking and blistering.
This text will use the term 'blistering' to describe the visually identifiable protuberances that occur as a result of laminate hydrolysis and other non-osmosis defects.
Details of the location of the blisters.
Has the blistered area been painted? If yes and the client feels confident that he can do this, ask him if he can check if the blisters are soft and indent under finger pressure. If this is the case, the surveyor should inform the client that the blisters may only be in the paint layer, but should also point out that this can only be confirmed through inspection of the defect by the surveyor or other suitably qualified and experienced person.
Has the vessel been previously treated for blisters or been given an additional gel coat treatment? If yes, ask to see documentation such as warranty and receipts, if available. If these are not available, try to find out if this is because they are missing or because the treatment was done by an amateur.
If an additional gel coat has been added, ask if it was an epoxy or polyester gel coat. Epoxy is three times less permeable than a polyester treatment and would therefore delay the onset of blistering.
If an additional gel coat was added, ask if this was done:
As a full osmosis treatment?
As extra protection against moisture ingress?
Age of vessel. If greater than 20 years old, some blisters are to be expected. If the vessel is only a few years old, the blisters are likely to be virulent and develop quickly and are most likely in the gel coat.
Ask if gel coat in the affected area is coloured. Hulls with pigments in the outer layers are more prone to blistering as the pigments compromise the 'wetting' ability of the resin, preventing full consolidation.
Is vessel kept in seawater or fresh water? Note that some marinas controlled by a lock gate may have a significant in-flow of fresh water from a stream. A vessel will sit lower in fresh water than in sea water; therefore the vessel may blister along the lower topsides where the vessel is sitting lower in the water than anticipated.
When out of season, is the vessel kept afloat or laid up ashore?
How long since vessel was last in the water?
How long since last being laid up?
Has the location of the vessel's mooring or berthing changed recently?
Has the vessel spent a period in warmer waters?
The above question regarding the length of time that the vessel has been out of the water is very important. In the early stages of blister formation, some types can shrink and even disappear altogether. For this reason, the surveyor should endeavour to inspect the vessel as soon as possible after the initial communication with the client. The length of time since the vessel has been lifted will also have an effect on moisture readings taken on any parts of the hull on or below the waterline. The surveyor's report should state and explain this when interpreting any moisture readings taken on the hull.
In addition to the details of the vessel and defects, it is important to gain clear and unambiguous details of the client's requirements, such as what they expect to gain from the report. Does the client just want an identification to be made, or does he require recommendations and a description of the remedial treatment too?
The surveyor will then post or email two copies of the contract to the client. A copy of the surveyor's terms and conditions will be included with the contract. The client should sign and return one copy of the contract to the surveyor before work commences.
The Survey Process
This section describes how the surveyor should undertake the survey. It includes a list of notes to be taken and a description of the initial general examination of the affected area. It then describes the surface examination that should be performed, together with likely areas of blistering where the surveyor should pay particular attention. The techniques used to identify the type of blister will be found in section 4.
Safety Check of Vessel and Immediate Vicinity
When the surveyor has arrived on site and has gained access permission from the yard or marina staff, a number of safety checks should be performed:
Vessel to be suitably shored with appropriate number and type of shores and supports. Discuss with yard staff if shoring appears to be unsatisfactory.
Check deflection of hull around shores. Excessive deflection in one or more shores may indicate that the vessel is incorrectly supported.
Check area around the vessel for evidence of vehicle, lifting crane or machinery operations. During the survey, pay attention to machinery or moving equipment.
Check for trip hazards and for areas of uneven or soft ground that may compromise the positioning of the stepladder.
Vessel & Survey data
The following data should be taken and noted on the surveyor’s checklist:
Vessel name.
Type.
Builder.
Model.
Date of Construction.
Hull colour.
Deck colour.
Hull number.
Hull material (including notes on sandwich construction, if applicable).
The following information on environmental conditions should also be recorded:
Condition of vessel (dirty, washed off etc).
Situation of vessel (slings, slipway, grid, blocks, cradle, mud berth).
Weather (fine, sunny, rainy, mist, snow, percentage cloud).
Ambient temperature.
Relative humidity.
Hull temperature.
Wind speed.
Wind direction (relative to vessel’s principle axis).
General Examination of Affected Area (Hull / Topsides / Deck)
Once the above notes and measurements have been taken, the surveyor should identify and record the following:
Type of coatings (including antifouling, paint, and lacquer) applied to hull / topside / deck surface since the vessel was manufactured.
Condition of coatings, including saponification or crackling.
Check around the skin fittings to see if the adjacent hull surface is raised above the rest of the hull. This may indicate that a previous treatment has been applied to the vessel where a significant thickness of gel coat and laminate was removed and was not reapplied to the original thickness. If this is the case, the remedial treatment is likely to be sub-standard and may not have cured a previous blistering condition.
Rudders, Keels and Water Tanks
A GFRP/FRP rudder is usually moulded in two halves with a stainless steel shaft and armature. Often the steel shaft is poorly sealed and water fills the voids inside the rudder. This water attacks the fibreglass and because it is mostly stagnant the hydrolysis fluids build up to aggressive levels.
GFRP/FRP keels can be damaged by a similar process. A keel with internal ballast is likely to trap water between the ballast and internal faces of the keel skin, resulting in similar water attack.
Water tanks, although less likely to have water stagnating inside for long periods, are prone to similar attack. As the water is fresh, the solution in a void is stronger than if the tank contained sea water. The result is a high osmotic potential and osmosis could start immediately.
Recording of Defects
The following notes should be taken, supplemented by photographs wherever appropriate:
Regions of blistering below the waterline can be outlined with a marking chalk, ideally in a contrasting colour to the affected surface. Take photographs to record these areas.
Make a note of the location of the blisters on the hull.
Note spacing of blisters.
Make a record of the coverage. Are they all over or just patches?
Record if wide apart or close together.
Record the total number of blisters, unless excessive or widespread.
If blistering widespread, count the number of blisters in a measured area.
Diameter and height of blisters.
Details of damage or defects described in section 3.7.
Photographs
Numerous photographs should be taken of the vessel, paying particular attention to the area (hull / topsides / deck) where blistering has occurred. The defects noted in section 3.3 should also be photographed.
Surface Examination, Looking For Blisters
Following on from the visual examination of the general surface condition, the surveyor should now look closely for blistering. Whilst carefully looking over the surface at a shallow angle (relative to the surface) the surveyor should run the fingers of a hand over the surface being inspected. Note that antifouling applications may be toxic and latex gloves should be used during the inspection process. If the lighting conditions are not suitable, shine a powerful spotlight along the surface to help highlight any-blister type defects. The following areas and features should be closely inspected:
Areas of hull near or below the waterline that have a cracked gel coat would be more susceptible to developing blisters. The surveyor should inspect these areas more closely, including taking & recording additional moisture readings.
Blisters often appear first along the waterline. Particular attention should be paid to this region.
If the blisters appear to follow a structural feature, such as a chine on a hull, this may be due to structural damage in this area. Look closely for cracked gel coat, removing antifouling if necessary to look for this.
Structural features, such as at chines, edges of simulated planking or other abrupt changes of shape, can also cause cavities to form in the lay-up during manufacture.
Local blisters can sometimes be found in areas such as the hull / keel joint, around skin fittings and rudders where fairing compounds have been used. This is not due to laminate hydrolysis and can be treated locally.
Blistering usually occurs over the entire submerged hull. If it is only in patches, it is possible that a repair has been performed in this area.
Another reason for blisters developing in isolated patches is due to the vessel paid laid up ashore with wet padding between the shore and hull surface. Materials such as carpeting will retain moisture for long periods.
Mooring damage. Note size, depth and location.
Abrasion & impact damage such as gauges and cracking. Note the size, depth and location. If cracks due to hinging around bulkhead or internal structure, a note should be made of this.
If the surveyor is present during the lifting out of the vessel, check for areas of antifouling that remain wet after the rest of the hull has dried out. This may indicate that cracks or crazing exist under the antifouling. Pay particular attention to these areas.
Scrape off Antifouling in Sample Areas
Antifouling should be scraped off in sample areas approximately 70x70mm in size. These sample areas should be where the blistering has been noted, but should also include areas that appear to be defect free. In addition, remove antifouling in areas adjacent to the blistering and inspect to see if more are developing there. A tungsten bladed scraper should be used to scrape away the antifouling. As well as removing the antifouling, the planing effect of a sharp scraper will remove material where the surface has become raised due to blistering. This will help to reveal where blistering is still at the early stages. Be careful not to remove the gel coat or any epoxy coating during this process.
The moisture content of these sample areas should be measured with a moisture meter and the values recorded.
Inspect for signs of wicking. This defect is easier to detect in un-pigmented gel coats, but can also be seen in pigmented gel coats. Section 4.4 describes this defect further.
Break Open Sample Selection of Blisters
A number of blisters should be opened up in order to inspect the state of the underlying void and laminate. A spike, such a screwdriver sharpened to a point or a bradawl, should be used for this task.
During the inspection and identification process, the following notes should be made:
Existence of Moisture in Void and pH Measurements
Note if the void is wet or dry. If the void is wet, measure the fluid with litmus paper. The level of acidity of the fluid is related to the time taken for the blisters to develop. Rub the fluid between two fingers. If it is sticky and greasy, it is glycol.
| pH value | Indication |
| 4 to 5 | Well developed |
| 5 to 6 | Moderate term development |
| 6 to 7 | Early stages of development |
| 7 | Neutral (fresh water, non osmotic) |
| 7.8 | Sea water |
| 8 to 9 | Alkaline, probably epoxy or amine booster (curing agent) |
Table 1: pH value and interpretation of measurements taken.
Colour
Table 2 below details the colour of fluid that may be found when opening up a blister.
| Colour | Likely origin |
| Red tint | Excess catalyst on American vessels. |
| Black liquid | Decomposition of foam core. |
| Brown stains, looks like rust | (1) Wood flour based filler, often found on Taiwanese vessels. |
| Brown stains, looks like rust | (2) May also originate from an epoxy tar barrier coat. |
Table 2: Colour of blister fluid and possible origins.
Smell
| Smell | Likely origin |
| Strong vinegar smell (acetic acid) | Decomposition of fibreglass and polyester. |
| No smell, neutral pH | Probably water trapped in large voids or a delamination. |
| Polyester smell (styrene) | Trapped during manufacture or from thinning resin that was going stale. |
| Amine smell | Indicates that a resin booster was used, perhaps during cold conditions. Look for other symptoms that would occur as a result of an undercure. |
| Amine smell | May also be from epoxy resin. May have been applied over a damp surface, causing blistering. |
| Sickly sweet smell | Glycol |
| Diesel or fishy smell | Fluid has seeped through from inside, due to poor moulding. |
Table 3: Smell of blister fluid and possible causes.
Look Inside Voids
When the blister has been opened up, look inside the void using a magnifying glass.
Moisture Readings
If moisture readings are high, but there is no visible blistering, it is unwise to recommend remedial treatment as moisture content has no direct correlation to laminate condition. Old boats often have high moisture readings in the hull, but have no blisters.
If the blistering is due to hydrolysis and subsequent osmosis, there will be moisture in the laminate and a moisture meter will show high readings. Note that high readings are not conclusive evidence that hydrolysis or osmosis is occurring or is about to develop. High readings could be due to a number of other factors, such as:
Water ingress to core.
Water in large voids.
Water in poorly wetted out areas of the laminate.
The recommended scheme of repair described in section 5 may include the drying of the laminate before application of filler, resin or gel coat. The surveyor should record the moisture of the laminate in these areas, noting the location on the vessel where the readings were taken. Subsequent readings should be taken in the same locations at regular intervals until the moisture of the laminate has reduced to an acceptable level. Section 5 discusses this in more detail.
Analysis and Identification of Blister Defects
General Considerations
This section describes what the surveyor should look for once the defect has been opened up.
It is important to establish the types of blister found. This will enable the surveyor to detail the significance of the defects in the client’s report and to make recommendations for the most appropriate method of repair.
The surveyor should take detailed notes throughout the inspection process. These notes should be supplemented by diagrams, sketches and photographs wherever necessary. Refer to section 3.5 and 3.6 for a discussion on recording of defects and taking photographs.
The recommended remedial action for each type of defect will be discussed in section 5.
Blister in Paint Coat
If the blistered area has been painted, check if the blisters are soft and indent under finger pressure. If this is the case, the blisters may only be in the paint layer and are non-osmotic. Scraping the surface with a sharp scraper will reveal if the blisters lie deeper.
Type 1 Blister (Aeration of Gel Coat)
Description
Blisters range in appearance from minute bumps giving the effect of surface roughening of the gel coat, to small blisters of pin head size.
Observation
May represent the early development of type 2 or type 3 blisters.
Alternatively, they may remain static for a long period with the blisters staying the same size and not spreading any further over the hull.
Caused by air enlargement within voids that are located within the gel coat.
These air voids are created during manufacture.
Moisture and air in the void may expand due to heating from solar radiation.
May also be due to water absorption into pigments of gel coat.
Notes
A further comparison should be made at the end of each sailing season. This comparison should determine the amount by which the size and number of blisters has increased, if at all.
Type 2 Blister (Wicking)
Description
Blisters follow the line of the laminate fibre strands.
May be located as a line of individual pin head size blisters.
These lines of blisters may also be in the form of an elongated ridge, in which case the gel coat may be cracked at the apex of the ridge.
Often found in closely spaced rashes, many following straight lines.
These blisters do not appear to get any bigger if monitored from one season to the next.
Observation
If found as individual blisters that follow a line, it is likely that these will form a ridge. This ridge may develop a cracked apex, if this has not already happened.
Type 3A Blister (Blisters in Double Gel Coat)
Description
Blisters typically 5 to 15mm in diameter.
Dome shaped.
With time out of the water, the blister may flatten out, becoming less pronounced.
When the vessel has been recently lifted out of the water, breaking the blister will release a fluid.
Fluid smells of vinegar with a pH value between 4 and 6.
When blister is broken, the material beneath appears to be a smooth and often glossy resin surface with no evidence of glass fibre protruding.
Occurs only in vessels with a double gel coat.
Observation
Blisters of this type may not recur once rectified.
Sometimes, repair may be followed by the same type of blister developing after a further season afloat and on a different part of the boat.
Type 3B Blister
Description
When blister is unbroken, it appears to be the same as type 3A.
When opened up for examination, glass fibres are seen to be exposed.
These fibres are well coated with resin.
No dry glass can be seen in the blister void.
The void in the blister is deeper than 3A type.
Observation
As with type 3A, blisters of this type may not recur once rectified.
Sometimes, repair may be followed by the same type developing on a different part of the hull, but may occur after a further season afloat.
Notes
Type 3B and 3C are the most common type of osmotic blister.
Type 3C Blister
Description
When blister is unbroken, appears to be the same as type 3A and 3B.
When opened up for examination, resin free, fluffy fibreglass strands will be observed.
Cavity is deeper than type 3A and 3B.
Cavity may contain foul water for a long period after vessel has been lifted out of the water.
Observation
This type of blister requires early rectification treatment. This work should not be delayed for any significant length of time.
Type 4 Blister
Description
This type of blister is much broader and flatter than types 1, 2, 3A, 3B, 3C.
Blister size normally 10 to 50mm diameter, raised 1 to 3mm above the surface of the surrounding laminate.
Readily found when viewing the hull from a shallow angle and when running a hand over the surface.
Observation
This defect lies beneath both the gel coat and the first reinforcement layer, possibly deeper.
Crescent Shaped Cracks
Description
Old blisters show distinctive crescent shaped cracks before opening up and forming craters. The crater will no longer contain any blister fluid, but the gel coat will slowly break up. Widespread craters also have an overall effect of thinning the gel coat.
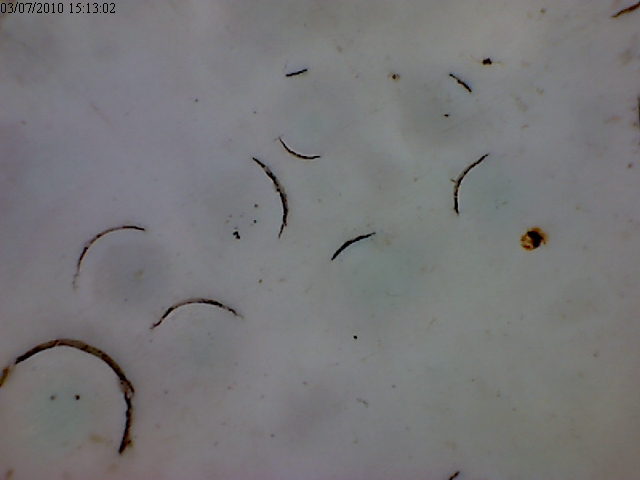
Figure 1: Crescent shaped cracks in the gel coat of the author’s boat.
Scheme for Rectification
Depending on the extent of the blistering, it should be recommended that the gel coat be removed locally or totally and the blister cavities opened up and cut back to sound and well resinated laminate that is free from dry glass fibres.
A general guide is that if these blisters cover an area of the hull that is 10% or less of the total hull area, they can be treated individually.
If the blisters cover more than 10% of the hull area, total removal of the gel coat below the waterline should be recommended.
If the vessel repair scheme includes a drying period that spans more than two weeks, regular measurements of hull moisture should be taken at specific locations. If the laminate is suffering from hydrolysis deterioration then the moisture content in the outer laminate will not dry out as quickly as unaffected areas.
Before rebuilding the gel coat, a set of wetness measurements should be taken.
Whilst the affected area is drying, the surface should be regularly washed with clean water to remove any hydrolysis residues that may accumulate on the surface of the laminate. These may be hygroscopic and prevent the laminate from drying if they are not removed.
For all types of blistering it can be recommended that the vessel is laid-up ashore when out of season in order to delay the development of further blistering. If the scraping of antifouling as described in section 3.8 reveals the early stages of blistering, the winter lay-up will also delay the development of these.
The sections detailed below are not the word-for-word text that would be inserted into the report, but have been presented as bullet points in this document in order that the recommendations for each defect type can be described as clearly as possible.
Blisters in Paint Coat
This is a non-osmotic type of blister.
These blisters will have no effect on the structural integrity of the laminate.
This is a cosmetic defect only.
The affected paintwork can be cut back with emery paper and a new paint scheme applied. This can be done at a suitable time, such as during the winter lay-up, paying attention to paint manufacturer’s recommendations for appropriate ambient temperature & humidity.
Type 1 Blister (Aeration of Gel Coat)
Significance
No significant effect on strength of the laminate.
Will only effect the protection given by the gel coat if it is widely spread.
Recommendations for Rectification
No immediate remedial action is required at this stage.
State in the report that a record of the affected area (notes as detailed in section 3.5) was made and the intensity of the defects in the affected area assessed.
Also recommend that an examination is made at the end of each sailing season in order to determine the amount by which the blisters have increased in size, number and location, if at all.
The blisters provide a more ready path for moisture ingress into the laminate, but this will help the hull to dry out if kept ashore out of season. It should therefore be recommended that the vessel is laid-up ashore when out of season.
Type 2 Blister (Wicking)
Significance
Annual inspection is essential in order to monitor any increase in coverage of these blisters.
This defect (and also Type 1) can expose the underlying laminate to water ingress by capillary action, allowing hydrolysis to occur deeper within the laminate. This means that it is important that the recommendations listed below are followed at the end of the season at the latest.
If widespread or accompanied by blisters, condition is more serious and remedial action should be taken.
Recommendations for Rectification
The train of blisters or the ridge formed by the linking of blisters should be broken open and loose fragments of the gel coat removed.
The groove should be cleaned and thoroughly dried.
The groove should then be filled with polyester or marine grade epoxy filler.
The vessel should be laid-up ashore when out of season in order to delay the development of further blistering.
Type 3A Blister (Blisters in Double Gel Coat)
Significance
Sometimes, repairs of this type may be followed by the same type of blister developing after a further season afloat and on a different part of the boat.
These blisters are not structurally significant.
Recommendations for Rectification of Unbroken Blisters
If blisters are not broken and depending on the size and number of blisters, the surveyor can recommend that the blisters are allowed to develop in other areas before undertaking a single overall repair.
A record should be made of size of blisters, number of blisters and extent of affected areas.
Recommendations for Rectification of Large or Broken Blisters
If blisters are large, broken or readily breakable, rectification should be undertaken at the end of the season.
The blistered area should be lightly sanded.
The area should be washed and thoroughly dried.
Exposed cavities should then be filled with polyester or marine grade epoxy filler.
The following link provides details of the West System method of repairing early stahe gelcoat blisters: Early Stage Gelcoat Blisters
Type 3B Blister
Significance
With this type of blister, the laminate is more prone to the ingress of moisture.
Recommendations for Rectification
Treatment of this type of blister should be performed at the end of the sailing season at the latest.
It is unnecessary to break open blisters that are smaller than 5mm.
Larger or broken blisters should be opened out and cleaned of loose debris.
The area should be wet sanded.
The treated area should be washed and thoroughly dried.
Exposed cavities should then be filled with polyester or marine grade epoxy filler.
Type 3C Blister
Significance
This type of blister needs early treatment and this work should not be delayed for any significant time.
The size of the defect will increase if left untreated and delamination could occur if treatment is unduly delayed.
If defect left for several years it could lead to a localised weak area in the laminate.
Recommendations for Rectification
If these blisters cover an area of the hull that is 10% or less of the total hull area, they can be treated individually.
If the blisters cover more than 10% of the hull area, total removal of the gel coat below the waterline should be recommended.
Depending on the extent of the blistering, the gel coat should be removed locally or totally and the blister cavities should be opened up and cut back to sound and well resinated laminate that is free from dry glass fibres.
Cavities should be thoroughly washed with water.
The affected area should be left to dry out in a warm, low humidity environment for as long as practically possible. This will ensure that any moisture that has passed along fibres by capillary action (wicking) will be removed.
If the treated area is small, the exposed cavities should then be filled with polyester or marine grade epoxy filler.
If the cutting process has removed large areas of fibre reinforcement, additional layers of glass mat and resin should be applied to build up to the original hull profile.
Treated areas to be finished with epoxy coating to thickness of 400μm, following the manufacturer’s instructions.
Type 4 Blister
Significance
This type of blister needs early treatment.
The size of the defect will increase if left untreated and delamination could occur if treatment is unduly delayed.
If defect left for several years it could lead to a localised weak area in the laminate.
Recommendations for Rectification
All such blisters should be located.
The laminate over the affected area should be ground back to sound and well resinated laminate that is free from dry glass fibres.
Cavities should be thoroughly washed with water.
The affected area should be left to dry out in a warm, low humidity environment for as long as practically possible. This will ensure that any moisture that has passed along fibres by capillary action (wicking) will be removed.
The cutting process is likely to remove large areas of fibre reinforcement, therefore additional layers of glass mat and resin should be applied to build up to the original hull profile.
Treated areas to be finished with epoxy coating to thickness of 400μm, following manufacturer’s instructions.
Crescent Shaped Cracks
Significance
Old blisters show distinctive crescent shaped cracks before opening up and forming craters.
The crater will no longer contain any blister fluid, but the gel coat will slowly break up.
Widespread craters also have an overall effect of thinning the gel coat.
Recommendations for Rectification
The broken blisters should be opened up and loose fragments of the gel coat removed.
The open voids should be cleaned and thoroughly dried.
The voids should then be filled with polyester or marine grade epoxy filler.